Knowledge Base
Having Trouble?
For security reasons, QNAP does not allow external access to their NAS using the administrator credentials and you cannot use the administrator credentials to log in using FileFlex. You must establish a user account on the NAS and log in with your user credentials.
To create a user on your QNAP NAS:
- Log in to the QNAP Finder software. (For more information about setting up a QNAP NAS and installing QNAP Finder, see the Quick Installation Guide for your QNAP NAS model available at the QNAP Support Center.)
- Make sure your computer is connected to the same network as the QNAP NAS and can access the Internet.
- Download the QNAP Finder software from the QNAP website here
- QNAP Finder will find your QNAP NAS on the local network. Open QNAP Finder, select the QNAP NAS that it finds, then click Login. Log in to the NAS with your administrator credentials
- Users are created by the administrator under Main Menu > Control Panel > User - see the Installation Guide for your QNAP NAS model available at the QNAP Support Center).
- Log in to the QNAP Finder software. (For more information about setting up a QNAP NAS and installing QNAP Finder, see the Quick Installation Guide for your QNAP NAS model available at the QNAP Support Center.)
Note: The following instructions are from the 2016 version of Outlook, though Outlook 2013 will be very similar. If you have a different version of outlook, see Microsoft's Help Page for exporting contacts to a .csv file, then continue with step 7 of this tutorial.
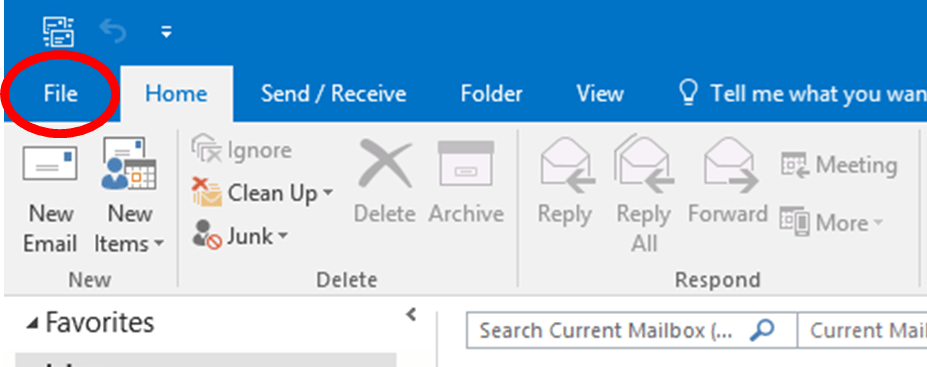
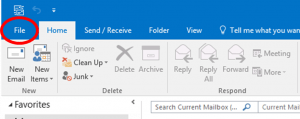
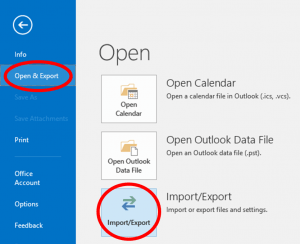
1. Open Outlook. In the top left, click File. In the dropdown menu that appears, click Open & Export and then Import/Export.
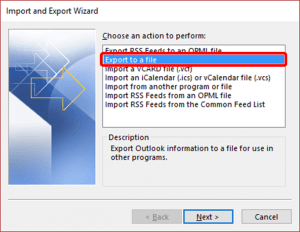
2. In the Import and Export Wizard select Export to a file, then select Next.
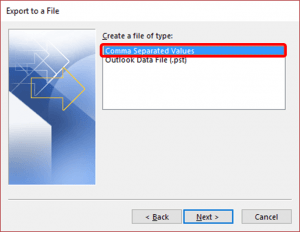
3. Choose Comma Separated Values and select Next.
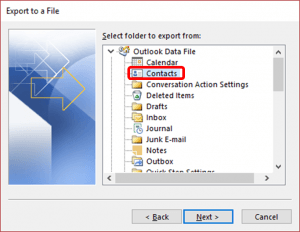
4. In the next Export to a File dialog box, find your Contacts folder and select it, then select Next.
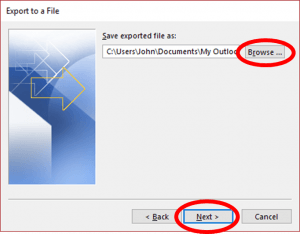
5. In the next screen, click Browse and navigate to the location you want to save the .csv file to. You’ll need to find this later to import to FileFlex, so give it a memorable name and click Next.
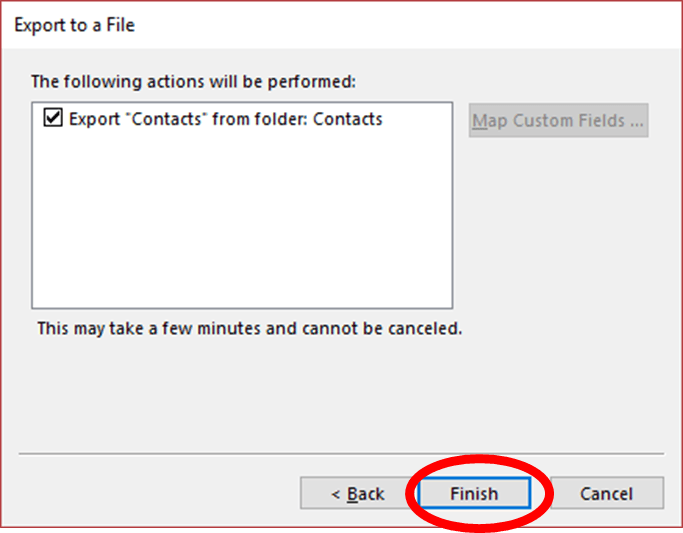
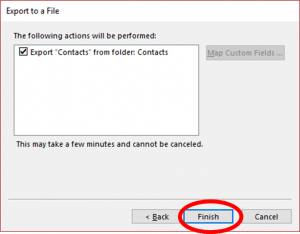
6. In the next Export to a File dialog box, select Finish.
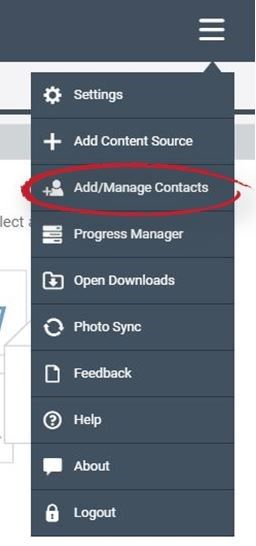
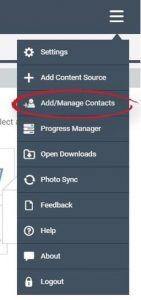
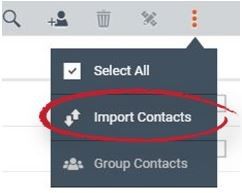
7. Open FileFlex. Select the menu in the Global Application Bar. In the dropdown, select Add/Manage Contacts.
8. This opens the contact manager. In the contact manager, select Import Contacts from the drop-down menu on the right.
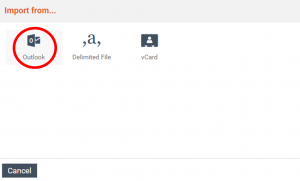
9. In the Import from dialog box, select Outlook.
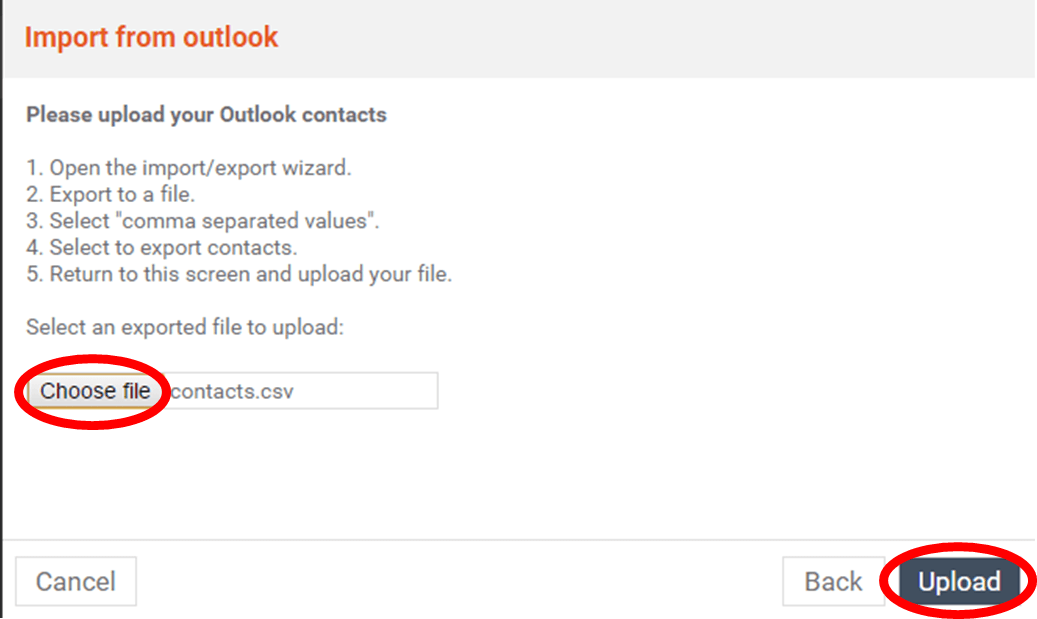
10. In the Import from Outlook dialog box, select Choose File.
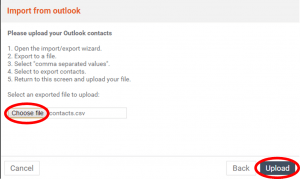
11. Navigate to the .csv file you exported from Outlook and select Open.
12. In the Import from Outlook dialog box, select Upload.
13. In the Contacts Imported dialog box, select Done.- Open Gmail. Select the dropdown under Gmail and select Contacts.

- In the left column navigation column, select More then select Export.

- In pop-up dialog box, select GO TO OLD CONTACTS.

- In the top navigation bar, select the More dropdown then select Export.

- In the Export contacts dialog box, select the All Contacts radio button and select the Google CSV radio button. Then select Export.

- Open FileFlex. Select the menu in the Global Application Bar.
- In the dropdown, select Add/Manage Contacts.

- This opens the contact manager. In the contact manager, select Import Contacts.

- In the Import from dialog box, select Delimited File.

- In the Import from csv dialog box, select Choose File.

- Navigate to the contacts file you exported from Gmail and select Open. The default download location is your Downloads folder. The default filename is google.csv.
- In the Import from csv dialog box, select Upload.
- In the Contacts Imported dialog box, select Done.
- In Contact Management, select Done.
- Open Gmail. Select the dropdown under Gmail and select Contacts.
- Open Yahoo Mail. Select the Contact Manager icon located in the top left corner navigation bar.

- In the top taskbar, select the Actions and in the dropdown select Export. A file will be exported to your downloads folder called yahoo_contacts.csv.

- Open FileFlex. Select the menu in the Global Application Bar.
- In the dropdown, select Add/Manage Contacts.
- This opens the contact manager. In the contact manager, select Import Contacts.
- In the Import from the dialog box, select Delimited File.
- In the Import from the csv dialog box, select Choose File.
- Navigate to the contacts file you exported from Yahoo and select Open. The default download location is your Downloads folder. The default filename is yahoo_contacts.csv.
- In the Import from the csv dialog box, select Upload.
- In the Contacts Imported dialog box, select Done.
- In Contact Management, select Done.
- Open Yahoo Mail. Select the Contact Manager icon located in the top left corner navigation bar.
- Open FileFlex on your phone or tablet. Select the Menu located at the top right of the Global Application bar and in the dropdown select Add/Manage Contacts.
- In Contact Management select the Menu in the top right corner of the taskbar and in the dropdown select Import Contacts.

- In the Import from the dialog box, select Device Contacts.
- Open FileFlex on your phone or tablet. Select the Menu located at the top right of the Global Application bar and in the dropdown select Add/Manage Contacts.
How to import from Linked In
See Help here.
- Open Linked In. Select My Network in the top navigation bar.
- On the left side of the page, you will see how many connections you have. Click the number that indicates how many connections you have.
- In the top right side of the page, click the link Manage synced and imported contacts
- On the right side, under Advanced Options, click Export contacts
- In the Download your data dialog box, click Connections, then Request archive.
- It will take Linked In several minutes to prepare your contacts for export. You can wait on this page, but Linked In will also send you an email when the download request is ready. Click the download link supplied in the email when it arrives. The link will open the Download your data dialog box in your account. (You may have to re-login to Linked In.) Click the Download archive box
- The file is sent in a zip format (*.rar) Unzip the archive file and save the file Connections.csv. This file contains your Linked In contacts.
- Open FileFlex. Select the menu in the Global Application Bar.
- In the dropdown, select Add/Manage Contacts.
- This opens the contact manager. In the contact manager, select Import Contacts.
- In the Import from dialog box, select Outlook.
- In the Import from Outlook dialog box, select Choose File.
- Navigate to the Connections.csv file you exported from LinkedIn and select Open. The default download location is your Downloads folder and the default filename is connections.csv.
- In the Import from Outlook dialog box, select Upload.
In order to add your personal computer to your FileFlex account, you will need to have a password on your PC. Depending on which operating system you are using, a quick internet search of “how to add a password on (Windows 10)” where (Windows 10) is replaced by the OS you are using should bring up tutorials to guide you through the process. This is a security precaution, intended to better protect the files and folders on your PC even when you are accessing them remotely through FileFlex. It is in general a safe practice to password-protect your computer.
FileFlex will allow you to share any file with your contacts. They will automatically be given a free account the first time they open the shared file. The file itself will open in the FileFlex web application if the recipient does not have FileFlex installed. Any subsequent times the recipient wants to view or download the file, they will need to use their FileFlex credentials to do so – they will receive a temporary password the first time they open the file. They will have access to the full features of FileFlex for thirty days after their account is created, and after that they will only be able to view and download files shared with them unless they pay a yearly subscription fee to FileFlex.
Once you’ve shared the file with someone, you’ll be able to see a record of who has accessed it through the Activity tab in FileFlex. If you choose to allow them to download it as well, you will also see those actions tracked in the Activity tab. You can enable or disable downloading for any individual by selecting the ‘sharing’ icon next to the file you have shared and checking the appropriate boxes.
Note that FileFlex sharing is permission-based – you will need to add the recipients as contacts and share the file with them. It is not a link that can be forwarded or added to social media. In this way, you can control exactly who has access to your files and folders.
For more information, you may want to take a look at the following Help files:
How do I share a file?
How to stop the sharing of a file
How to view notifications
How to view the Activity logYou may not be able to download because either the sharer has not given you permission to download or because the shared file is stored on a device that is not currently on and connected to the internet - a PC, for example. In this case won't be able to download that file until the device is turned on.
The best solution is to make sure that any files you share are stored somewhere that's always on and connected to the internet, such as a Network Attached Storage device (NAS) or a server. Alternatively, make sure you communicate with the person who is sharing the file with you so you can access it to download.
If you encounter slow downloading, it is likely due to the upload speed of the sender, not the download speed of the recipient.
FileFlex currently supports ASUSTOR, Netgear, Qnap, Synology, and Drobo devices. However, if you have an unsupported NAS you can still access it through FileFlex if you have another connected device on the same network, such as a server or a PC.
First, select the server or PC in FileFlex, then click on "Network" in the right column.
Next, select the NAS or other device you'd like to access. You may be prompted to enter the device credentials, and then you will have access to the files on that device.
Note that if you are using a PC to network into your NAS, your PC will have to be on, not hibernating, and connected to the network in order to be able to access files on your NAS remotely.
You need to be a full user of FileFlex in order to share files with others, though a free account will still let you view any content that's been shared with you. In order to share files with you, your client will either need to use the 30 day free trial version of FileFlex or purchase the full version.
No, FileFlex doesn't store or sync your files to any server anywhere. Your files are shared, accessed, and streamed from their source locations. If your files are stored on your PC, then you are accessing them from your PC. If they are on your NAS, you are accessing the NAS using FileFlex.
The FileFlex server acts like a switchboard to connect you to your files. Your files are not synced, copied, or stored by FileFlex or any third parties.
Since FileFlex does not copy or sync any of your files, they will stay on your storage. There are no copies or backups created by FileFlex.
No. Your files stay in their source locations, so any issues with FileFlex software will not affect your files. A file cannot be "accidentally" deleted.
Yes, you can upload photos and videos from your mobile device to your NAS, or any other connected storage using FileFlex. If you'd like to upload your photos and videos to your NAS, you will first need to add your NAS to FileFlex as a content source. FileFlex currently supports NAS devices from QNAP, Netgear, and Synology. If you have a different NAS, you can access it through our Networking feature.
After you have added your NAS to FileFlex, you can set FileFlex to automatically backup your photos and videos from your phone or tablet to your NAS through the Photo Sync feature.
You can find instructions on how to add your NAS to FileFlex below:
You must use the FileFlex desktop client and be on the same network as your NAS when you are adding your NAS as a storage repository. Download the desktop appropriate client from http://fileflex.com/support/downloads/download-fileflex/ and please make sure you are on the same network as the NAS. You must also make sure that you have added the FileFlex connector to your NAS. For complete instructions go to: https://help.fileflex.com/en/connecting-to-your-content.
The presence of "x" over a content source reads the message "This content is currently inaccessible". Your device needs to be ON, connected to the internet and not in sleep mode. If these 3 are TRUE, and you have installed FileFlex and connected it to a content source correctly, then you should be able to find that content source remotely from any other device(s). If you still get the 'x', try installing FileFlex again. Note: If you tried to connect to your content source and the connection failed, the content source will still show on your dashboard but will not work. Click the menu beside the content source repository (3 dots), delete it and try connecting to it again.
In order to share a folder, check the box next to the folder or files you would like to share, then click the Share icon in the activity bar. Type the name of the contact you would like to share the file with. Repeat the previous step if you want to share with multiple contacts. Here, you can also set the sharing options for media files to be 'view only' or 'downloadable'. When finished, click Share.
Via FileFlex, your recipients have access only to the folder or files that you permitted and nothing else. They do not know where that folder is located; they can access only what you permitted. They will receive an email letting them know that you shared the folder or files with them and a link. When they click the link, it opens FileFlex on their device and they can access the shared folder or files using FileFlex.
You do not need to give them any access codes. You simply need to share your files with them by following the steps described above.
For more information, check our Help Section.
https://help.fileflex.com/fch/en/share-files
You can reset your password yourself using our web app.
The process is easy.
1. Just go to the FileFlex login screen at https://share.fileflex.com
2. Enter your email address that you use forFileFlex and then click Next
3. On the next screen, there is a link below, next to the Login, that says
"Reset Password"
4.Click "Reset Password" and follow the instruction.
- If you want to connect your desktop (or any Personal Computer),you will have to do it from that desktop (or PC). You cannotactivate your desktop from your mobile phone.
For Windows PC:
You need to enter the domain only if your PC is part of a company or corporate network. You can check if you're a part of any domain by going to Control Panel >> System and Security (or Performance and Maintenance for older versions of Windows), and click on the System icon.
There you will see information such as you Full computer name, etc. Also, under Computer description, you will see the Domain your computer belongs to. If instead of Domain, you see WORKGROUP, it means that your PC does not belong to any domain, and you can leave the Domain field empty as you enter your credentials to log in to a content source.
Generally, a personal computer that is not a part of any company or corporate network does not have a domain.
For MAC Computer:
If using a Mac computer, contact your IT department for your domain name.
For more information, visit our Help section.
https://help.fileflex.com/fch/en/connecting-to-your-content
If you wish to delete your FileFlex account, follow the steps below.
1. Click Open Menu on the Global Application Bar and choose Settings
2. You will then see an option of Delete my account at the bottom. Click on
it.
3. Finally, click Yes from the dialog box to confirm your deletion
This is caused by either typing an incorrect username or incorrect password. Since the username is created when the PC is initially configured or user account created and not normally ever referred to again, it is common to not know the exact username.
How to Determine Your Device Username
Windows PC:
Determine your username using Task Manager as follows:
- Type 'Ctrl-Alt-Del' keys at the same time,
- Select 'Start Task Manager'.
- When Windows Task Manager opens, select the 'Users' tab.
- Your device username is listed in the User column.
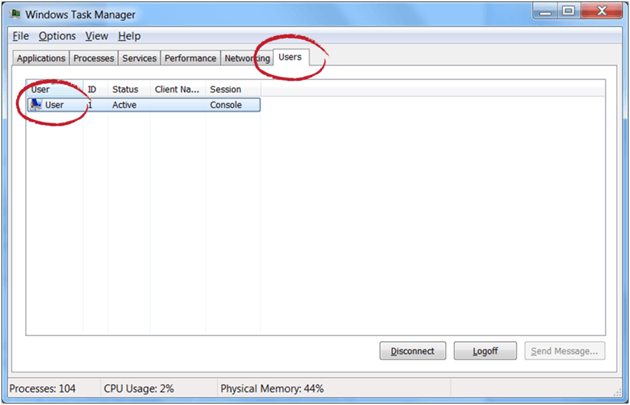
Finding your device username on a Windows PC using Task Manager
An alternative is to use the Command Prompt as follows:
- Click the 'Start' button
- Type 'cmd' in the search bar to open the Command Prompt
- Type the following command at the cursor: echo %username%
- You will then be supplied your username.
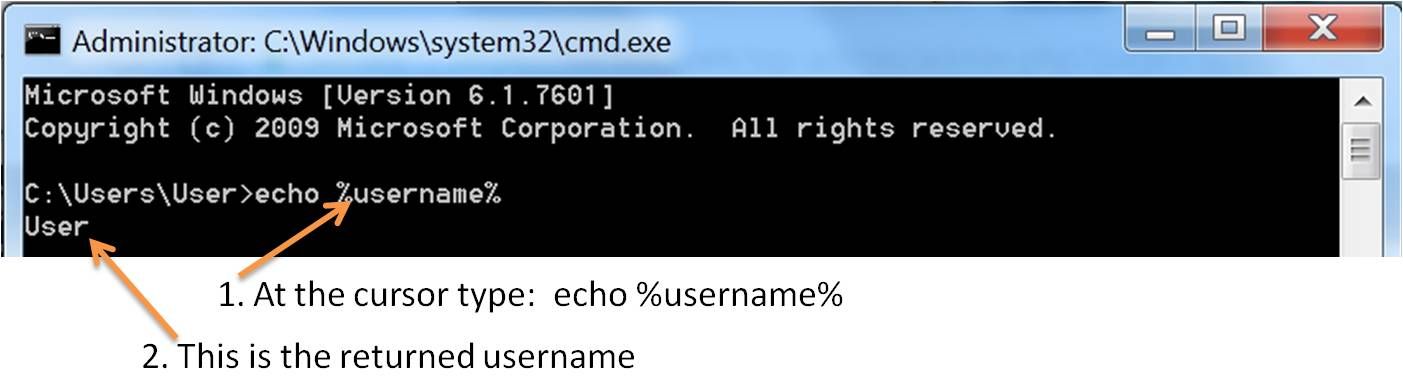
Finding your device username on a Windows PC using the Command Prompt
Mac:
- Click on the Apple menu,
- Select 'System Preferences'
- Click the 'Sharing' icon.
- Your computer name will be listed at the top of the window that opens.
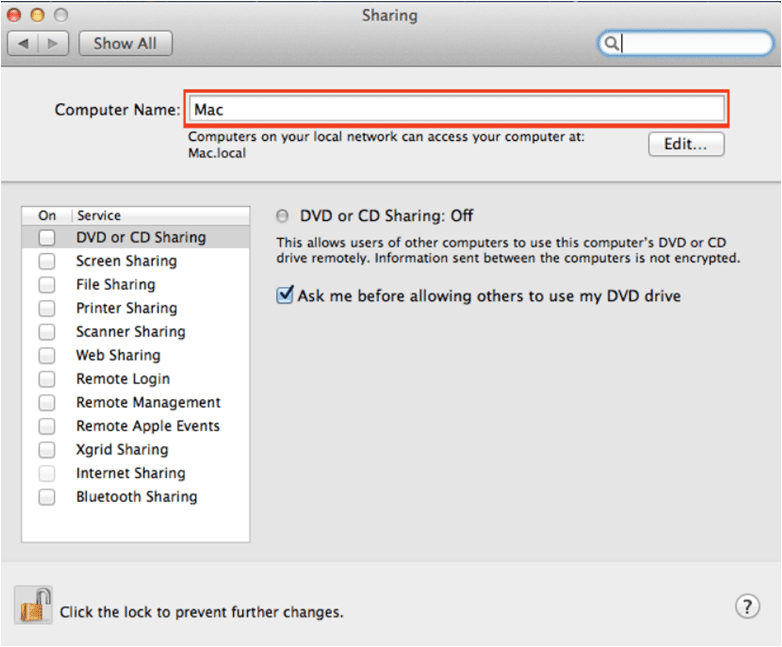
Finding your device username on a Mac
During the installation of FileFlex, FileFlex will update some components of your OS that it needs to run properly. In this case, FileFlex updated routines that were also used by an out-of-date AMD graphics driver. To resolve, simply update the AMD graphics driver. To update your driver, go to https://support.amd.com/en-us/download and click Automatically Detect and Install Your Driver.
The PC needs to be on, not in sleep mode and connected to the Internet. If these are all TRUE, then perhaps FileFlex is being blocked by your firewall or anti-virus software (if it includes firewall protection). In a corporate environment, you need to not only check the firewall of your PC, but also the corporate firewall and allow FileFlex access through the firewall.
Since the username is created when the PC is initially configured or user account created and not normally ever referred to again, it is common to not know the exact username.
How to Determine Your Device Username
Windows PC:
Determine the username on a Windows PC using Task Manager as follows:
- Type 'Ctrl-Alt-Del' keys at the same time,
- Select 'Start Task Manager'.
- When Windows Task Manager opens, select the 'Users' tab.
- Your device username is listed in the User column.
Finding your device username on a Windows PC using Task Manager
An alternative is to use the Command Prompt as follows:
- Click the 'Start' button
- Type 'cmd' in the search bar to open the Command Prompt
- Type the following command at the cursor: echo %username%
- You will then be supplied your username.
Finding your device username on a Windows PC using the Command Prompt
Mac:
- Click on the Apple menu,
- Select 'System Preferences'
- Click the 'Sharing' icon.
- Your computer name will be listed at the top of the window that opens.
Finding your device username on a Mac
This error message is due to entering device login credentials that FileFlex does not allow and is usually caused by entering a blank password or inadvertently including a space at the end of the password.
When activating a new content source such as a personal computer or a NAS, you will be asked to log in to your device and enter your username and password. For security reasons, FileFlex requires that you must have a password established - it cannot be blank. For example, if you have not established a password to log in to your PC, and leave the activation log-in password field blank, then you will receive this error message and will not be able to connect to that PC with FileFlex. You must set up a password to your PC.
Another reason is that you may accidentally have a included blank space at the end of the password that you are entering. This is most common in instances where passwords are copy and pasted into this field. When copying your password to the clipboard, please make sure that there are no inadvertent spaces being included by the auto select. FileFlex will see that space as a character and not recognize the password.
Due to restrictions from the operating system, you cannot add a NAS or server from the 'Add Content Source' function of the Main Menu (3 horizontal bars in the top right corner of the app) from an iOS device such as an iPhone or iPad. To add a NAS or server using the 'Add Content Source' function you must do so from a personal computer that is on the same network. Once you have logged into FileFlex from your PC and used that PC to add your NAS or server as a content source, it will be added to your FileFlex dashboard and can be accessed from your iOS devices. For more instructions on how to add a NAS as a content source click here.
First realize that FileFlex does not store or make copies of any of your files. FileFlex does keep a record of your activities that you can access in the Activity Tab. To delete all information that FileFlex has under your account, you need to delete your account. To delete your account click the main menu in the top right corner (3 horizontal bars), then choose Settings. Under Settings, click Delete My Account. Your account and all recorded activities will be deleted. The only information we retain for a limited period of time is your email address. This is to prevent possible repeat use of the free 30 day trial period.
FileFlex will not accept a password that contains spaces. First make sure you are not using a password that contains spaces. Second, if you are using cut and paste to enter your password, the auto select may be inadvertently adding a space. Try entering your password using the keyboard.
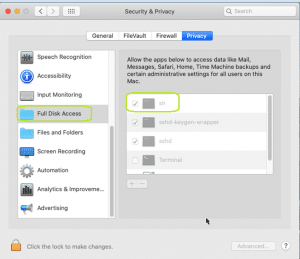
A "You have no permission to perform this action" error message on a MAC, the issue lies with your privacy and security settings. To allow access go to System Preferences > Security & Privacy > Privacy > Full Disk Access and check the radio button to allow "sh" for full disk access.
Enclosed is a screen capture.
On May 30 2020 one of the chain root SSL certificates for Sectigo (formerly Comodo) expired.
As a result of this broken chain of SSL certificates, your currently installed FileFlex connector is unable to connect to data repositories and receive upgrades from Qnext servers. This means your FileFlex application will not function as expected. That is because in order to keep data secure and provide the highest level of security, FileFlex is designed to check for a broken chain of certificate.
We recommend that you re-install your FileFlex clients and connectors immediately by downloading them from the link below. You must reinstall your client and connector on your PCs and the connector on your servers, Network Attached Storage (NAS) devices and ASUS routers. You do not have to uninstall current connectors; you can just choose to install over current installation.
You can find your PC client/connectors, NAS connectors and server connectors via this link.
https://fileflex.com/support/downloads/download-fileflex/
If you are using FileFlex to connect to the USB attached storage of an ASUS router then you will need to reinstall the connector via the router’s home page. Please find instructions via this link.
https://help.fileflex.com/pages/viewpage.action?pageId=49874300